The goal of this was to get a long term time lapse of my garden growing each season using off the shelf hardware. The camera used for this is a SV3C SV-B01-1080PL bullet camera powered with POE. The camera is mounted outside with a fixed view of the garden. At the start of this project a new gmail account was acquired to be used with only this camera. The email section of the camera was configured and tested. Then then camera was configured to send an image every hour to the above mentioned gmail account.

To date this has resulted in eleven thousand plus emails with photos. Manually downloading and extracting the photos seemed like a tedious and boring process so a different route was found using the Thunderbird mail client. The client was installed and configured to use the gmail account. Then the attachment extractor extension was added.
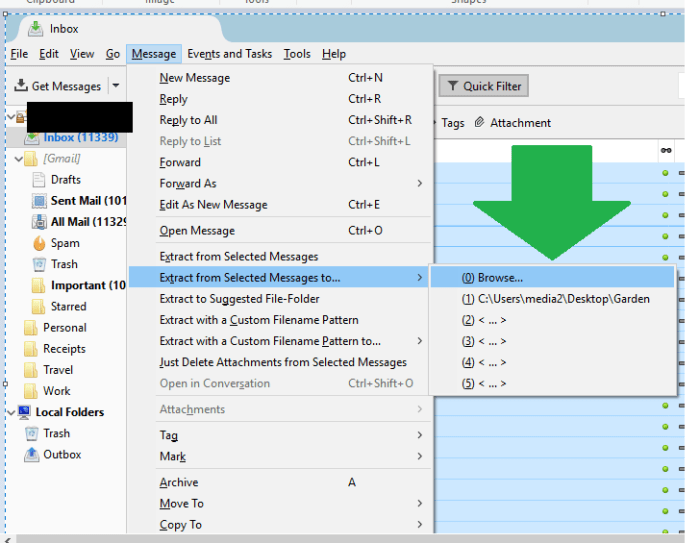
This extracted all the attachments to a folder. The extracted images had varying degrees of brightness so the output folder was batch processed using PhotoScape.

After the batch processing was done the group still contained images that happened during night times or photos with excessive shadows. Luckily the output files had a similar file nameing structure so a simple C# program was written to move and re-name photos shot during specific times of day. The paths will need to be tweaked to run it on a different system. Here is the code:
using System;
using System.IO;

namespace PhotoCleaner
{
    class Program
    {
        static void Main(string[] args)
        {
            try
            {
                var folderLoc = @"C:\Users\media2\Desktop\New folder";
                var destFolderLoc = @"C:\Users\media2\Desktop\Output";
                var directoyInfo = new DirectoryInfo(folderLoc);
                var Files = directoyInfo.GetFiles("*.jpg");
                var counter = 1;
                foreach (FileInfo file in Files)
                {
                    Console.WriteLine(file.Name);
                    //file.Name = "IMG_chn0_TIMER_MNG_20170522164542_001.jpg"
                    var fileName = file.Name.Trim();
                    fileName = fileName.Replace("IMG_chn0_TIMER_MNG_", "");
                    var year = fileName.Substring(0, 4);
                    var splitFileName = fileName.Split('_');
                    if(splitFileName.Length == 2)
                    {
                        var rawDate = splitFileName[0];
                        var hour = rawDate.Substring(8, 2);
                        var hourInt = int.Parse(hour);
                        if(hourInt = 16 && year == "2018")
                        {
                            File.Copy(Path.Combine(folderLoc, file.Name), Path.Combine(destFolderLoc, $"frame{counter.ToString().PadLeft(4, '0')}.jpg"));
                            counter = counter + 1;
                        }

                    }
                }
            }
            catch (Exception ex)
            {
                Console.WriteLine(ex.ToString());
                Console.ReadLine();

            }
        }
    }
}
After running the above code a folder with files named frame0001.jpg, frame0002.jpg… should be generated. To stitch the files together FFMPEG was used. After installing FFMPEG it was added to the system path. This blog helped figure out the different flags that needed to be set in FFMPEG http://notes.theorbis.net/2010/05/creating-time-lapse-with-ffmpeg.html The parameters suggested in the blog post were tweaked slightly to end up with this:
ffmpeg -r 12 -i frame%04d.jpg -qscale 0 -s hd720 -vcodec libx264 -preset fast -crf 25 OUTPUT.MP4
Here are the results:
2018 (short):
2017-2018 (long):
Improvements:
The above C# code could be improved by accounting for sunrise and sunset values in the time calculations. This should account for the sun shifting in other seasons and make the video have less of a strobe like occurrence from shadows.